How to Fix a Gallery Image on eBay
April 1, 2007
Have you ever listed a bunch of items on eBay through Turbo Lister only to find out the gallery image was wrong for all of them? Don’t panic! Read below to find out how to keep it from happening to you and how to fix the gallery image.
Turbo Lister Settings
 Prevention is the best cure. If you choose your Turbo Lister settings correctly you won’t have to worry about the problem in the first place.
I always copy a previous listing and change the details when posting a new item on eBay. The screen shot of the Listing Upgrades in Turbo Lister shows the Gallery Picture box checked and the Gallery URL option selected.
The problem with this setting is that when you copy and paste items, you have to remember to update your url every time. Otherwise you’ll get the gallery picture of the previous item, which is what happened to me recently. I listed ten lacrosse items all with an image of a snowmobile vest, rather confusing to lacrosse shoppers.
The simple solution is to choose the Use Photo 1 option and it will automatically use the first picture that you are displaying for your item.
Changing Your Gallery Picture
What if you already have the wrong gallery picture for the product you uploaded to eBay? Good news, you can change the gallery image in just two simple steps.
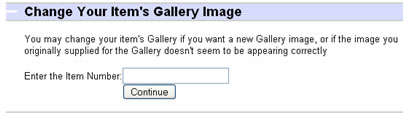
1) Go to the Change Your Gallery Image page, Enter your Item Number in the input field shown below, and Click Continue.

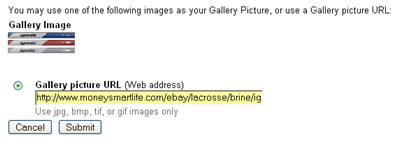
2)Enter the correct web address of your gallery image in the input field underneath the Gallery picture URL option shown below and click the Submit button.
You’ll be taken to another page confirming your change. Congratulations, your gallery image has been fixed, the crisis is over. Happy Selling!


All posts by Ben Edwards

Comments
One Response to How to Fix a Gallery Image on eBay
Trackbacks/Pingbacks